Halloween is almost here and there should be lots of fun costume parties this weekend. If you haven’t carved your pumpkin yet, or are looking to add more to your decorations, it’s never too late! Especially when it comes to a fun and simple DIY like this.
Craft pumpkins are THE way to go these days when it comes to carving your pumpkin. Not only will they last forever, they’re inexpensive and have none of the messy goop to deal with. Though I do love fresh baked and salted pumpkin seeds…
Supplies Needed:
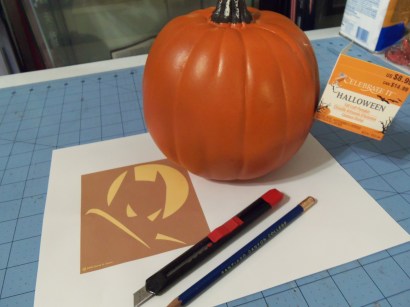
- Craft Pumpkin
- Stencil
- Pencil
- Pumpkin Carving Tools (not pictured)
- Battery Powered Tea Light Candles
Optional Supplies:
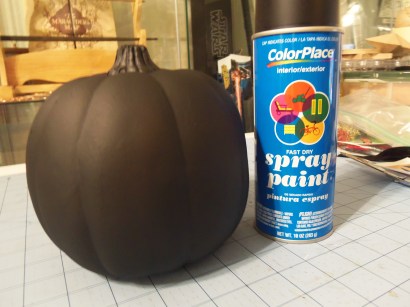
- Spray Paint
- Glue
- Rhinestones
- Tweezers
I picked up a small craft pumpkin from Michael’s for this DIY. While the larger pumpkins allow for more intricate and bigger designs, it also means a lot more carving! Going with a small pumpkin means less carving time, and it’s easier to find a place to put int if you live in an apartment or are short on space.
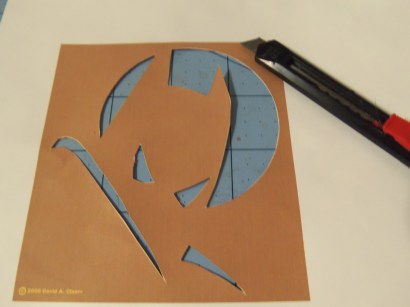
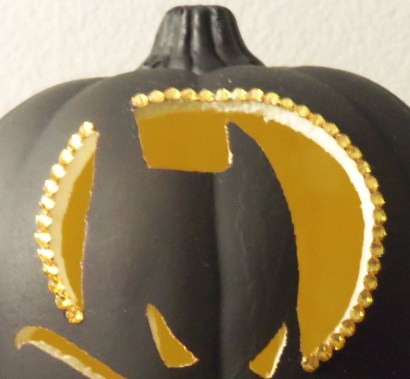
What better theme to go with for a pumpkin carving than Batman?! It’s the 20th anniversary of Batman: The Animated Series this year, so I decided to pay tribute by selecting a BTAS carving pattern I found for free on this website. I used a razor to cut out the pieces that would need to be traced onto my pumpkin.
Before I drew the stencil onto my pumpkin, I decided I wanted my pumpkin to be black. I love the classic and familiar look of an orange pumpkin, but black suited my Batman theme better, and a black pumpkin is a lot easier to keep around as a decoration past the Halloween season then an orange pumpkin is. Black goes with everything!

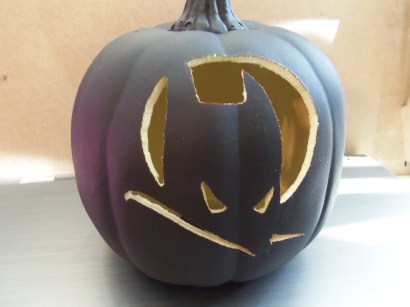
After I’d spray painted by pumpkin, I placed my stencil onto the surface and used a pencil to trace the pattern onto the pumpkin. Because I was working with such a small surface, and I was worried tape might damage the painted pumpkin, I just held the stencil in place with my hand as I traced.
Then it was time to carve! This time of year you can find pumpkin carving kits pretty much anywhere. I picked up a set of carving tools at Walmart for $4. Carving a craft pumpkin is exactly the same as carving a real pumpkin. I was able to carve this pumpkin up while watching TV. I love to craft while watching shows!
At this point your pumpkin is carved and ready to be displayed, it just need a light! You’ll need a battery powered tea light to light up your carved craft pumpkins. They even have flickering features so they look like real candles! I didn’t want to cut up the top of my craft pumpkin to the way you would a real pumpkin, so instead I cut a hole in the bottom of my pumpkin for the tea light to go through.
Carved pumpkins really shine at night when they’re lit up, but I wanted my pumpkin to look cool even in daylight, and have the possibility of being a decoration well past Halloween. I embellished the moon part of my caving with gold rhinestones so Batman would be silhouetted by a shimmering yellow moon, day or night!
In one easy afternoon I had my craft pumpkin painted, carved, decorated, and ready to display! While I adore real pumpkins and childhood memories of carving them, craft pumpkins are just so much more practical and enjoyable to work with. You can decorate and modify them to your heart’s content and never have to worry about them going bad and all your hard work going to waste! Depending on how you carve and craft them, they can even make a stylish decoration to have up all year round.
We’d love to see what pumpkins you’ve carved and decorated for Halloween. Share your pics with us on Facebook or Twitter!




[…] DIY […]
[…] More fun with craft pumpkins: paint ‘em black and light up a silhouette. […]